

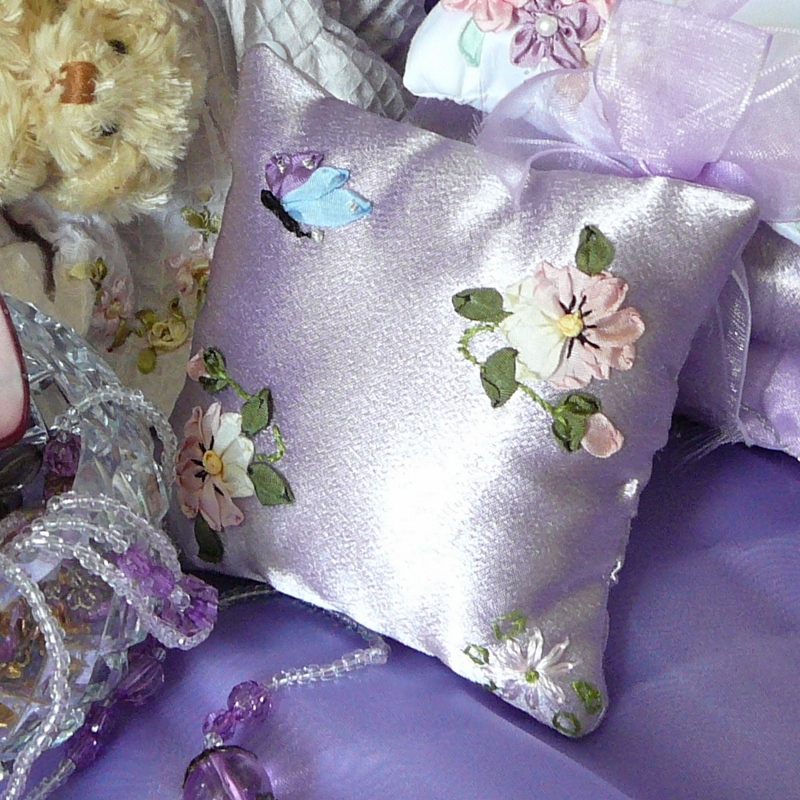
Potpourri Pillows
Silk Ribbon Embroidery Project
Stitches Used:
Stem Stitch, Ribbon Stitch and Straight Stitch.
Pansy Tutorial Link
Pansy Tutorial Link
Pansy:
Ribbon – 7 mm.
Cream, Pale Pink, Dusty Pink ( 3 Colours in the Pansy)
7 mm.
Yellow for French Knot Centre.
7 mm.
Green for Leaves and Calyx.
7 mm.
Lilac and Blue for Wings of Butterfly.
Threads - Black Thread
for markings on Pansy and body of Butterfly.
Green
Thread for stems and markings on leaves.
Metallic
Thread for eye of Butterfly and on wings.
Instructions:
Pansy: Transfer
the design onto material of choice with water erasable pen. This
can be done using a light box or by
placing the pattern and material up to a window.
Allow enough material to be able to
insert in the embroidery hoop and cut out later.
Cut a piece of wadding the size of the
material, and tack this onto the fabric. This
is needed to stitch the ends of the
ribbon down and also helps while embroidering.
It is best the you get into a routine
of stitching the ribbon down at the start and finish
immediately, if not, it is too easy to
snag while you are working and all your good
work can be wasted. Place fabric in
Hoop.
1. Work Pansy in Ribbon Stitch with a Radius of 1 cm. Using the example on the
pattern below. First make 3 Stitches in Cream no's 1,2,3 making sure to stitch
down all Ribbon ends well, do this as you are beginning and ending each Ribbon.
As you are working in such a confined area it is too easy to
catch with your needle and pull on the previous stitches.
Change to Pale Pink ribbon, complete 4,5,6,7. Lastly with Dusty Pink Ribbon
9 and 10, which should overlap the Pale Pink Ribbon.
2. Thread the Black Cotton (1 Strand ) and make small straight stitches.With
Yellow Ribbon make a single French Knot, taking care not to pull too tight,
this is where you will see the resemblance of a Pansy taking shape.
3. Next step to make small buds from the Dusty Pink and leave these slightly
loose, place two Green Ribbon Stitches over top, crossing at the tip. Complete
all the leaves in Green and then place a straight stitch in Green Thread
( 1 Strand) at the tip of the calyx.
4. Stem Stitch the stems of the Pansy Buds ( 2 Strands).
5. With Lilac and Blue ribbons make 4 Ribbon Stitches for the Butterfly Wings.(tutorial)
Starting with the longest wing area. The Body is made from 3 or 4 Straight Stitches
in Black Thread ( 2 strands) one small stitch for the antennae and then with
Metallic Thread a small French Knot at the end. Complete with 4 small French Knots
at the tip of the wings.

Pillows:
Top Pillow Embroidered -
Cut Material 2 - 12 x 12 cms Square.
After completing Ribbon Embroidery,
overlock and machine
stitch to area of 10 x 10 cms.
Leave an opening on one side to insert the filling.
(I think it is best if you only include
potpourri in the two larger bags,
just in case it stains the embroidery)
Using small slip stitches in matching
thread close the bag.
Second Pillow:
Cut 2- 15 x 15 cm Pieces Finished size 12 x 12 cms.
Third Pillow:
Cut 2 -16 x 16 cms Finished Size 14 x 14 cms.
Finish off by stacking the 3 Pillows and
tying with Organza Ribbon.

Check out your fabric stash and you may
find many leftover remnants that
would work well for these pillows.
Think personal gifts for Christmas
or Birthdays etc.
Carol Daisy

Comments
Post a Comment